Saturday, March 9, 2013

Easter Mantel


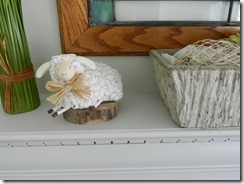
After much fiddling, I am finally happy with my Easter mantel.  This is not that post where I say, “Oh I just used things I had laying around the house.” Nope,  I bought almost everything on the mantel, and I didn’t spend a fortune.  There is a mix of Pier One, Homegoods, Dollar Tree and some items from my most favorite store of all, called, Heavenly Scent Herb Farm.  But you know, sometimes you just have to get some new accessories, and I have a great mix of things I can use all year round.  So I’m not feeling guilty about it.

               DSCN3727  DSCN3725                DSCN3728  DSCN3726
                                                                       
As a had said in my last post about the  Wreath Tutorial, I am feeling less bright and cheery colors and more subdued this year.  I am craving Spring and earth, so I really wanted my mantel to reflect that.  I Confirmed that feeling was when I added this cute and colorful banner from Target.  It just felt out of place with all my natural tones.  So that came down.
                 DSCN3731

Easter mantel
Above is the mantel without a banner.  It looks pretty, and I think after Easter I can go back to this.  But in the meantime, I replaced it with some egg shaped paper cut-outs that I got from the Paper source and decorated them with some washi tape that just so happened to come in the mail today!  Happy Bonus!  I then stapled the eggs onto some burlap I had and attached to the mantel.  This feels so much better to me.

DSCN3741
easter mantel banner 2
The stain glass window and the wood circles were mine, so I guess I didn’t really buy everything new. Sorry if the color is a little off,  I got so excited I didn’t want to wait until tomorrow when the lighting will be better.
So with Easter only 3 weeks away, a beautiful sunny 50 degree day, and springing ahead with daylights savings time tonight, I am really starting to feel more optimistic that SpRiNg really is on it’s way!

If you like what you see, then follow me!
FACEBOOK                   PINTEREST       HOMETALK
or subscribe on the side bar ☞

Where I'm partying:

Saturday, March 2, 2013

Easter Wreath–Dollar Store updo


Say it isn’t so!  I took some dollar store colorful eggs and a dollar store grapevine wreath and hot glued them together.  You’ve seen this wreath a million times.  It’s cute and colorful and really just fine on it’s own, really it is!  However, this year for some reason, I’m just not feeling that colorful.

DSCN3688

I’m feeling more earthy and natural with my décor.  Maybe because the kids are getting older and don’t care so much about cute and colorful things.  What ever the reason, I decided to tone this wreath down by painting it Sage green.

DSCN3692

Then I added some reindeer moss from the Dollar Tree to deepen the earthiness and make it feel less like eggs on a wreath.

DSCN3696

So now it’s starting to match my mood a little more.  I finished it up by adding some sage burlap.  I wanted it to be simple.  Some little rolls of burlap tucked into some openings and fringed out, and a simple sweet bow. 

DSCN3700 
Viola!!  Another dollar store updo. 


Thanks for stopping by.  I’m working on getting my Easter mantel up and hope to have it posted soon.  Hope you’ll come back and see it!
 
 
If you like what you see, then follow me!
FACEBOOK         PINTEREST             HOMETALK
or subscribe on the side bar ☞

Where I'm partying:


Saturday, February 23, 2013

EAT


I don’t know about you, but there is a word I have uttered every single day since the day my children were born.  You see, my children are both picky eaters, slow eaters, distracted eaters.  It seems not a day or even a meal passes without the me saying the word – EAT!  at least once to at least one of my children. 
I’ve decided to make it my family motto.  Some family have mottos that are inspiring, loving, or caring, not me.  Mine’s more of a command.  I’m not proud, but it’s what I’ve become.
So recently while at Homegoods I came across the word that haunts me on many days.  It was a black one piece sign, so I plunked down the $25 and took it home.  The only problem was it was slightly too long for the space I wanted to hang it.  So back it went.  The idea though was still in my mind, and so off to Michaels I went to pick up those 3 little letters along with some yarn that looked like twine. I came home and lovingly wrapped those letters in yarn.  I used a tab off of a pop can as a hanger on the back.

                                                                                  DSCN3675

                                                                                                             DSCN3681
A little hot glue here there helped hold the yarn in place.
eat

When I finished I hung those 3 letters up over the kitchen sink as a reminder of what my kids are supposed to do.  The good news is,  when the kids are grown and gone, I think I’ll switch those letters around to read Tea.  Same three letters with a whole new meaning.

If you like what you see, then follow me!
or subscribe on the side bar ☞

Where I'm partying:


Tuesday, February 5, 2013

Ombre wall art


Seems Ombre is all the rage these days.  It’s everywhere from hair, to clothes, to home décor.  A gentle motion of colors merging together.  It has flow and flow reminds me of yoga.  I’ve been doing yoga for 3 1/2 years now and love it so much.  My body actually craves it now.  Yesterday my yoga teach said, you don’t do yoga, you are yoga.  And I thought, yeah, that makes sense to me!  You see, for me, the thing I love most about yoga is allowing myself to make peace with things. Sometimes actually almost daily, I carve out a little time to make peace with my day, to accept the things I can’t change, and make a renewed promise to myself that tomorrow I can do better.  Most of the time I do this when I get in bed at night.  A few minutes of deep breathing, along with a review of my day calm me down, and allow me to sleep - well, most of the time.  And almost always my thoughts turn into prayers, where I turn my trouble over to God to hold for the night.  I can always pick them up in the morning.
So, WOW! that was my inspiration to make this little picture.  It’s simply an 8 X 10 canvas, some acrylic paints, and a stencil.  The words are press on sticky letters.  So simply, yet so important to remember.

                                          find peace
Namaste


where i party:

Monday, February 4, 2013

How to make your own tartar sauce


I don't know about you, but I like my tartar sauce.  When I have white fish, it always taste better with some sauce to dip it in.


It seems every time I buy tartar sauce, the next time I use it, it is expired and I have to throw it away.  Sorta like all those salad dressing bottles.  I recently cleaned out my salad dressings and found one from 2008!  I swear, I'm usually really good about getting rid of expired things.  Don't know how that slipped by.  So tonight I found myself making fish and once again checking for tartar sauce.  Nope, none to be found.  I was disappointed for a second and then realized I could make up my own with only two ingredients.  


Yep, it's just mayo and relish mixed together.  I didn't measure it, but I'd say a tablespoon of mayo and a teaspoon of relish sounds about right.  You can make as much or as little as you like.  I found a list of ingredients in Hellmann's Tartar sauce.  It's long and scary.

Water, Soybean Oil, Sweet Pickle Relish (Cucumbers, Distilled Vinegar, Sugar, Dextrose, Salt, Xanthan Gum, Mustard Seed, Natural Flavor, Curry Powder), Onions, Sugar, Modified Corn Starch, Vinegar, Egg Yolks, Dijon Mustard (Water, Mustard Seed, Vinegar, Salt, White Wine, Citric Acid, Tartaric Acid, Spices), Salt, Xanthan Gum, (Sorbic Acid, Potassium Sorbate, Calcium Disodium EDTA) Used To Protect Quality, Spice, Phosphoric Acid, Color Added, Lemon Juice Concentrate, Citric Acid, Natural Flavor, Extractives of Paprika.

Yikes!


The nice part is you can use low-fat mayo, cutting down on the fat and calories.  I've used light mayo for years.  I swear it doesn't taste any different. I've been kinda smitten with the Olive oil based ones lately.

It's so easy and nice to have fresh tartar sauce just mixed up. It's just one less thing to buy and throw away.  Try it, I think you will like it.

  If you like what you see, then follow me!
FACEBOOK        PINTEREST         HOMETALK
  or subscribe on the side bar ☞


Where I'm partying: 


Friday, February 1, 2013

Valentine Mantel Reveal


Welcome February!
valentine mantel 2013 2

Notoriously the worst month of the year here in Michigan.

valentine mantel 2013 8

Gray clouds rule the sky on most days. 

Valentine Mantel 2013 6

It’s cold, and Springtime seems so far away. 

DSCN3559

Winter coats and mittens are a mainstay, and quite frankly we all get a little cranky with cabin fever. 


valentine mantel 2013 5

So when the sun peeks out, even for a few hours, like this morning. . .

valentine mantel 2013 4

You get so excited that you might need to take a picture!

valentine mantel 2013 3

And your Valentine Mantel might just be the thing to remind you that February is also the month. . .
            valentine mantel 2013 7


for love!!

  If you like what you see, then follow me!
FACEBOOK        PINTEREST         HOMETALK
  or subscribe on the side bar ☞


Wednesday, January 16, 2013

Valentine Onesie


I think I’ll do this post in reverse!

Because I just can’t help but start with my finished product.  It’s amazing how much cuter this is on a real live baby! make that  - on the cutest baby!


                onesie2

You see I decided to paint a onesie as part2 of a Dollar Store challenge, because let’s face it, one dollar store project is just never enough!
Perhaps you’ve seen my other project, Valentine Soap dispenser, where I used some doilies to modge podge a soap/lotion dispenser.  Well I had quite a few doilies left over, and I wanted to make something else.  I found this pink onesie and knew I could use the doile to stencil the heart onto the shirt.  So I made it, but something was . . . missing.  

Yep, a baby.


              onesie4  


              onesie

Did I mention my baby is almost 10 now, and a boy?  What this project needed was a baby girl.  So for the price of my work, I rented one.

                                                      onesie3


I think she’s just what I (it) needed! 
Don’t you just want to eat those thighs?

  If you like what you see, then follow me!
       FACEBOOK           PINTEREST              HOMETALK
  or subscribe on the side bar 

Where the parties at:

Tuesday, January 15, 2013

Valentine Soap dispenser–A Dollar Tree Challenge


Isn’t life grand when we can create a thing of beauty out of something from the Dollar Tree?  I  think so!  Which is why I love, h love, h love a Dollar Tree challenge!  Not only does it give me a chance to be creative, but I also get to see the creative genius of the many other ultra-talented bloggers.


My project this time is a little upstyling on a soap or lotion dispenser. 

My materials were:  Soap Disp ($1), package of heart dollies ($1), modge Podge, raffia, and old heart broach.
                            disp 4


I started by cutting the dollies up, using only the decorative edges.  I then applied Modge Podge to the soap dispenser and randomly applied the paper pieces, finishing up with another coat over the top, and allowing it to dry.  Afterward I tied on the raffia and the broach and I was done!


disp


And that my loves is it!

Have a lovely day!

                If you like what you see, then follow me!
                                       FACEBOOK           PINTEREST              HOMETALK
                                                            or subscribe on the side bar 

Linky Party's

Wednesday, January 9, 2013

Upcycle Valentine Wreath


I've just barely gotten the Christmas decorations down and put away, and here I am making a Valentine Day Project already.  I made this wreath out of Christmas floral picks I found at Michael's for 80% off.  The colors were all mauve and pink, so I figured at 20 cents a pick (with 3 bulbs on a pick) I could make this wreath for under $10.  The heart shaped grapevine wreath was $6.99 minus 40% off ~ $4.20, the tooling was $3 for two yards, and the picks under $3 for a bunch.  Sorry no before pictures.  This was a sit right down and do it kind of craft.    


I used a glue gun to glue on the large balls, followed by smaller balls (I had to pull them off one at a time and there were quite a few), I then wrapped the tulle I had cut into strips in between the balls.  


One more time:


fun, easy, cheap!  My kinda craft!

thanks for stopping by!

               If you like what you see, then follow me!
                                FACEBOOK           PINTEREST              HOMETALK
                                                   or subscribe on the side bar 

Where I am partying:


Saturday, January 5, 2013

Painted Dresser - Restoration Hardware style- Tutorial


Happy New Year!  I hope you had a great Holiday Season.  I've been on a bit of a break from blogging.  Decided to focus on life, and really once all my Christmas crafts were done and the house was decorated I really didn't have many creative juices flowing anyway.  I actually just finished removing all my Christmas decorations today, and by removing, I mean they are pile in the basement ready to be re-boxed until next year.

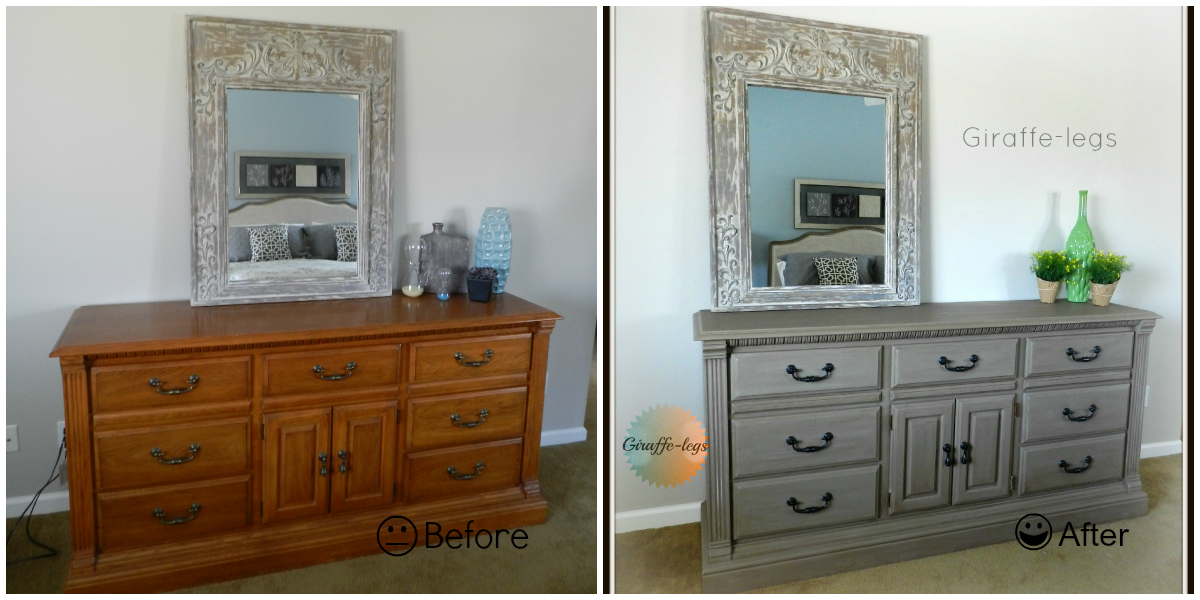
I am still working on redecorating my master bedroom.  Gosh, it feels like forever, but the good thing about it, is that it's upstairs and tucked away, so people never really see the mess.  My latest painting job may very well be my most difficult to date.  Looking back at the pictures I realize I've been working on this for almost two months, but seriously I am in love and don't care how long it took.   I wanted to try and re-create the wood on my new Restoration Bed.  If you look carefully in the mirror you can see a glimpse of it.  They have such a beautiful finish, and while I splurged on the bed, spending $3,000 or so on a dresser just wasn't happening.  Especially when we had a really great quality dresser, with a not so great finish straight out of 1992.


I started by removing the hardware and painting the dresser in Annie Sloan Chalk Paint - Coco.  Lovely as it was, it just didn't have the depth and layers I needed.

The next step I added the dark wax directly to the paint.  This was the part when I thought oh s#*@!  What have I done?  But of course it was just that first stroke that freaked me out.  It really does change the color of the paint dramatically.


Here is a picture of the color difference with and without the wax.  


And here is the entire dresser with dark wax.  Again, quite lovely, but not where I wanted to be.


I then painted Annie Sloan old white on the dresser with a dry paint brush, allowing it to dry (which on top of the wax was still workable) and buffing in streaks of dark wax.  This process is what took forever.  Once I was happy with the finish I allowed it to sit for several days, and then applied a coat of clear wax over the top and buffed it with a soft cloth.  The end result was a multi-layer effect with lots of character.
 I will let the pictures below speak for themselves.  


I spray painted the hardware in Oil Rubbed Bronze.


If you like what you see, then follow me!
FACEBOOK           PINTEREST              HOMETALK
or subscribe on the side bar 

Where I'm partying at: