Wednesday, January 16, 2013

Valentine Onesie


I think I’ll do this post in reverse!

Because I just can’t help but start with my finished product.  It’s amazing how much cuter this is on a real live baby! make that  - on the cutest baby!


                onesie2

You see I decided to paint a onesie as part2 of a Dollar Store challenge, because let’s face it, one dollar store project is just never enough!
Perhaps you’ve seen my other project, Valentine Soap dispenser, where I used some doilies to modge podge a soap/lotion dispenser.  Well I had quite a few doilies left over, and I wanted to make something else.  I found this pink onesie and knew I could use the doile to stencil the heart onto the shirt.  So I made it, but something was . . . missing.  

Yep, a baby.


              onesie4  


              onesie

Did I mention my baby is almost 10 now, and a boy?  What this project needed was a baby girl.  So for the price of my work, I rented one.

                                                      onesie3


I think she’s just what I (it) needed! 
Don’t you just want to eat those thighs?

  If you like what you see, then follow me!
       FACEBOOK           PINTEREST              HOMETALK
  or subscribe on the side bar 

Where the parties at:

Tuesday, January 15, 2013

Valentine Soap dispenser–A Dollar Tree Challenge


Isn’t life grand when we can create a thing of beauty out of something from the Dollar Tree?  I  think so!  Which is why I love, h love, h love a Dollar Tree challenge!  Not only does it give me a chance to be creative, but I also get to see the creative genius of the many other ultra-talented bloggers.


My project this time is a little upstyling on a soap or lotion dispenser. 

My materials were:  Soap Disp ($1), package of heart dollies ($1), modge Podge, raffia, and old heart broach.
                            disp 4


I started by cutting the dollies up, using only the decorative edges.  I then applied Modge Podge to the soap dispenser and randomly applied the paper pieces, finishing up with another coat over the top, and allowing it to dry.  Afterward I tied on the raffia and the broach and I was done!


disp


And that my loves is it!

Have a lovely day!

                If you like what you see, then follow me!
                                       FACEBOOK           PINTEREST              HOMETALK
                                                            or subscribe on the side bar 

Linky Party's

Wednesday, January 9, 2013

Upcycle Valentine Wreath


I've just barely gotten the Christmas decorations down and put away, and here I am making a Valentine Day Project already.  I made this wreath out of Christmas floral picks I found at Michael's for 80% off.  The colors were all mauve and pink, so I figured at 20 cents a pick (with 3 bulbs on a pick) I could make this wreath for under $10.  The heart shaped grapevine wreath was $6.99 minus 40% off ~ $4.20, the tooling was $3 for two yards, and the picks under $3 for a bunch.  Sorry no before pictures.  This was a sit right down and do it kind of craft.    


I used a glue gun to glue on the large balls, followed by smaller balls (I had to pull them off one at a time and there were quite a few), I then wrapped the tulle I had cut into strips in between the balls.  


One more time:


fun, easy, cheap!  My kinda craft!

thanks for stopping by!

               If you like what you see, then follow me!
                                FACEBOOK           PINTEREST              HOMETALK
                                                   or subscribe on the side bar 

Where I am partying:


Saturday, January 5, 2013

Painted Dresser - Restoration Hardware style- Tutorial


Happy New Year!  I hope you had a great Holiday Season.  I've been on a bit of a break from blogging.  Decided to focus on life, and really once all my Christmas crafts were done and the house was decorated I really didn't have many creative juices flowing anyway.  I actually just finished removing all my Christmas decorations today, and by removing, I mean they are pile in the basement ready to be re-boxed until next year.

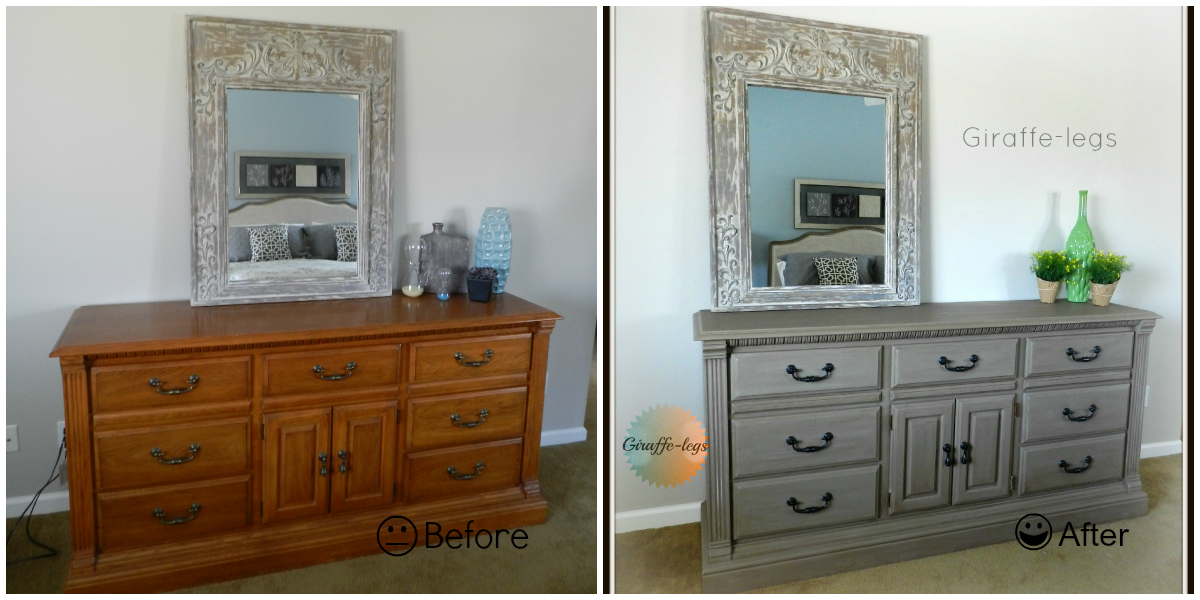
I am still working on redecorating my master bedroom.  Gosh, it feels like forever, but the good thing about it, is that it's upstairs and tucked away, so people never really see the mess.  My latest painting job may very well be my most difficult to date.  Looking back at the pictures I realize I've been working on this for almost two months, but seriously I am in love and don't care how long it took.   I wanted to try and re-create the wood on my new Restoration Bed.  If you look carefully in the mirror you can see a glimpse of it.  They have such a beautiful finish, and while I splurged on the bed, spending $3,000 or so on a dresser just wasn't happening.  Especially when we had a really great quality dresser, with a not so great finish straight out of 1992.


I started by removing the hardware and painting the dresser in Annie Sloan Chalk Paint - Coco.  Lovely as it was, it just didn't have the depth and layers I needed.

The next step I added the dark wax directly to the paint.  This was the part when I thought oh s#*@!  What have I done?  But of course it was just that first stroke that freaked me out.  It really does change the color of the paint dramatically.


Here is a picture of the color difference with and without the wax.  


And here is the entire dresser with dark wax.  Again, quite lovely, but not where I wanted to be.


I then painted Annie Sloan old white on the dresser with a dry paint brush, allowing it to dry (which on top of the wax was still workable) and buffing in streaks of dark wax.  This process is what took forever.  Once I was happy with the finish I allowed it to sit for several days, and then applied a coat of clear wax over the top and buffed it with a soft cloth.  The end result was a multi-layer effect with lots of character.
 I will let the pictures below speak for themselves.  


I spray painted the hardware in Oil Rubbed Bronze.


If you like what you see, then follow me!
FACEBOOK           PINTEREST              HOMETALK
or subscribe on the side bar 

Where I'm partying at: