Tuesday, October 30, 2012

Chicken wire memo boards

I wanted to share with you some memo boards that I made last year as gifts for some of my family members.  I know these were all the rage last year, but I never posted about the ones I made, and maybe someone is looking for a Christmas gift idea.  Plus I'm just feeling a little down about the hurricane that went through last night.  I don't live on the Eastern Seaboard, but my heart has been breaking and worrying all day and night for them.  I pray that everyone is OK and that not too many precious memories and antiques were lost.  Is that weird that I feel sad about the history of that area that might have been lost?  Weird or not, it's on my mind, not to mention I keep wondering about if people are finding sea life in their houses and streets.  


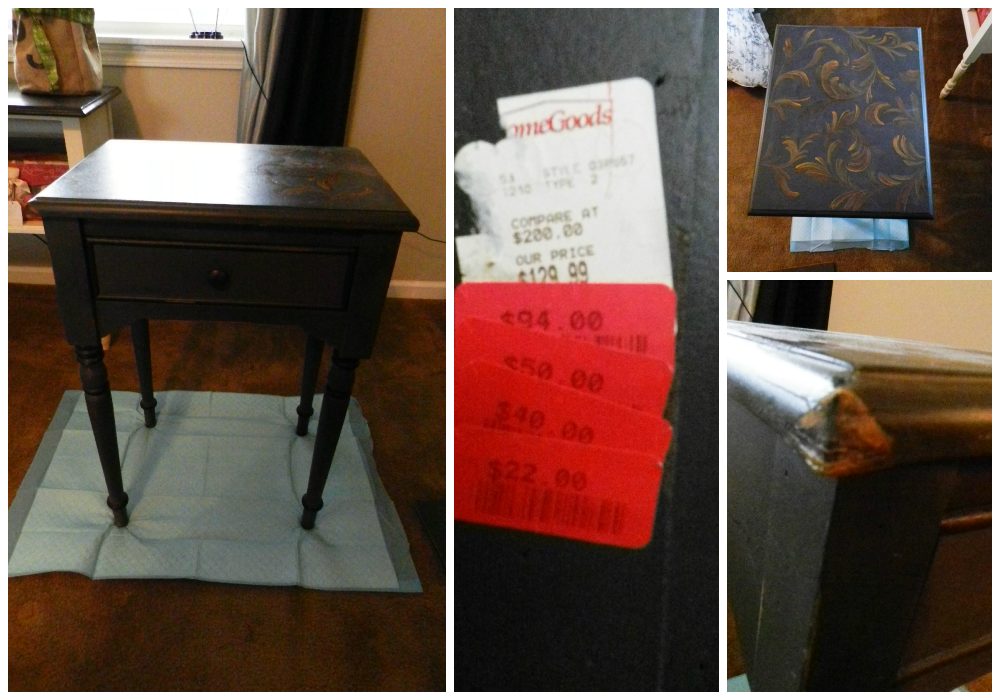
Anyway, I've been busy working on updating my bedroom and painting a custom bed and cedar chest for a customer.  The painting is turning out to be much easier than the bedroom.  


The bedroom is a slow work in progress, but I am very excited about how it is coming out! Slowly I am finding the things that I need to make it my own.  I'll share that at a later date.


These boards were made out of old frames, which I hand painted and then distressed.  Chicken wire is stapled to the frame.


And then fabric was stapled on last.  


I used a variety of establishments to add some whimsy.


 Buttons, sequins, and some stickers.


It was a good way to use up some of those last stragglers you have lying around, and you are thinking you really don't have enough left to do anything with.


It's fun to be able to personalize them for the people you are going to give them to.  Each board seems to have a personalty of their own.  Funny thing is I remember feeling rushed to finish these in time for Christmas, but looking at the date, I'm thinking I had it in total control.  


This Christmas I am already done with my presents for these same people.  Can't say too much since they may (or may not) be reading this!! 

Tomorrow is finally Halloween, and I feel like Christmas is going to explode on November 1st.  Seems everyone is busting at the seams to get started.  I can't believe the amount of bloggers who say they have finished their Christmas mantels.  I can't go there yet, or for another month.

Hope this day finds all of you safe, sound, and in a warm place.
We'll pray for the others.

Take care and never forget how fortunate you are.

Diane


Where I'm Partying at this week:


The 36th AVENUE

Whipperberry

Handmade Holiday Gift Idea Swap

Monday, October 22, 2012

Blind Cleaner

These are my blinds before:


And these are my blinds after:


I've been in this house for 3 1/2 years.
The blinds were dirty when I moved in. 
I cleaned them, but the gunk was stuck on them. 
They looked better, just not great. 
They are metal Hunter Douglas blinds.  
This window is above my kitchen sink and gets a lot of splashing, and I'm assuming, cooking grease. 
Every now and then I would try to clean them again, but the grease was tougher than I was!  

So, what miracle product did I use?  Nothing more than my

Click on for link


So not only did it get rid of the stink in my front loader washer, it has now saved my blinds (and my pocket book, I was about to give up).  All I did was take them down and put them in the bathtub with a scoop of detergent and hot water, let them soak for about an hour, more or less, rinsed and wiped clean!  They are so shiny I seriously can not believe it!


I wish all of my blinds could fit in the tub, but I am planning on using a bucket and doing the ones that won't fit.  

Clean blinds make me happy. 

If you haven't tried making your own laundry soap, what are you waiting for?

Sunday, October 21, 2012

Nightstand redo


 I found this nightstand at Homegoods for $22.  As you can see if had a little damage to the corner.  I wasn't sure if I could fix it, but for $22 a girl has to take a chance.  The table is made of pressed partial board, so I took some glue and squirted it in to the layers and clamped it down over night.  Worked great in firming it up, but the paint was still damaged.  I've been working on my master bedroom lately.  We upgraded to a king size bed from a queen and my new bed is finally being delivered this week.  I wanted to do something that would compliment both my new bed and my new bedding too.  I decided to try a custom mix with my Annie Sloan Chalk paint I had on hand, mostly because I didn't feel like making the trip to the closest store that carries her line.  Here's the mix I came up with:


5 parts French Linen
3 parts Paris grey
2 parts old white

After painting the table, I added a square of old white for accent.

Please ignore that pile of clothes.  The room is in transition.
 No bed, mattress on the floor right now.


Which also ties in with the satin trim on my new bedding. 


I applied a piece of linen fabric to the inset on the drawer front, and a elegant glass knob to kick up the pizzazz factor.


I plan to update my curtains to a linen, so it this will add some nice continuity to the room. 


The color is the softest grey.  I feel like the blue walls and lighting kind of throw the color off a little.  So now my little $22 table is looking like a million bucks!  And that little boo-boo?  What boo-boo?!  

Hope you enjoyed seeing this transformation!  


Partying at:

Today's Creative Blog

My Uncommon Slice of Suburbia

The 36th AVENUE
shabby creek cottage


2013: Glitterglueandpaintthrowback-thursday-4/

Thursday, October 18, 2012

Dimensional Snowflakes on Canvas

Are you ready to let it snow?  I'm not!!  But I've had this craft on my mind for so long, I just wanted to get it out of there  and make it come to life.  


I made this beautiful 3 dimensional snowflake canvas out of three 8X10 canvases from Hobby Lobby.  I think they were $2 a piece.  My snow flakes were created by printing out snowflakes from The Graphic Fairy site.  I then laid parchment paper over the print outs and used 3 dimensional paints to trace the images.


Parchment paper is really the best choice for being able to easily remove the snowflake once it is dry.  I tried various other methods including wax paper and saran wrap.  The parchment paper was far and above the best.  Once you are finished tracing, allow the paint to dry for several hours or better yet, overnight.  I then carefully peeled off the snowflake and flipped it upside down and sprayed the back with spray adhesive.  Apply the snowflakes onto the canvas in desired pattern.  After allowing to dry for a few minutes I then applied Martha Stewart Acrylic paint in Pearl in 2 light coats which gave it a nice shimmer.


Adding some smaller shimmery sequins shaped like snowflakes and a strand of iridescent pearls evenly to the back of the canvases, tied them all together.  Then I topped it all off with a lace bow.


The result is a really pretty 3-D sparkly picture.  I love this so much and it really can last all the way through Winter, not just Christmas.   

So happy this idea stayed in my head for so long and it kept haunting me until I brought it to life.  Now I have some empty space in there!!  I'm sure I can fill it with other projects - no problem! :0

 Thanks for stopping by!  I'm trying to get my  followers up to 50, so if you like this project and would like to see more, please follow me on the side board!  Thanks!!!

Diane


Where I'm partying:

Debbiedoo's

My Uncommon Slice of Suburbia

Whipperberry

Thirty Handmade Days

Tuesday, October 16, 2012

Favorite new apps for saving

I'm not a huge techie, but I wanted to share a couple of new apps I recently started using on my Iphone.  I've been using coupons for as long as I can remember.  In fact, I can't even remember a time when I didn't use coupons.  I learned from my mom who sat at the kitchen table every week clipping her coupons and planning out her savings strategy for the week.  A definite requirement in a house with 5 kids and only one income.  She needed to stretch her money as far as it could go.  Once I married, I took up the weekly coupon habit.  Times were much tougher financially back then and I loved being able to save enough money that we could afford a few extra things every now and again.  As the years went on and the finances improved, I kept right on using coupons and saving.  Eventually my husband ended up working at Valassis, which is the company that prints those Redplum coupons.  Now despite what everyone thinks, no, we did not have access to a bunch of free coupons, in fact we NEVER got any "freebies".  My coupon obsession continued, now as a way to support the company my husband worked for more so than anything else, but the joy of saving never went away.  He doesn't work there anymore, and well I think it's just a habit at this point, some 21 years later.  

One of the most annoying things about couponing, is having to carry them around with you all the time.  I use store coupons, like 30% of at Kohls or 20% off at Macy's or 40% off at Joanns, because I find they can save you a lot of money when you are buying the basics, like clothing.  I have a large yellow envelope I keep in my car, but remembering to bring them with you doesn't always work, and seriously why must the coupons be all different sizes and why do they have to be so gigantic?  I really think we need some legislation that puts a size requirement on coupons.  

Anyway. . . My favorite new app is called Snip Snap.  You can take a photo of all of your store specific coupons and it stores them for your use!  No more carrying around all those coupons in my purse!  The photos are available to other people too, so if you forgot to take the photo, or don't get coupons for that store, you still have access to them.  Brilliant!  If your coupon is specific to you and can only be used once, you can mark it as private.  Again - Brilliant!  It doesn't work on manufacturers coupons just yet, but they are working on it.  Oh, and I almost forgot, when you walk into a store you have a coupon for, it reminds you that you have a coupon and when it's about to expire too.  Seriously, I am in love with this app!  And best part for last - it's FREE!  Link to Snip Snap App

The second app I'm digging is called RedLaser.  This allows you to scan the UPC code of an item, and then it searches stores for the best price!  No more wondering if it's cheaper somewhere else!  It also has a top deals section where they let you know specials at online sites or you can browse deals by store.  This could come in real handy during the Christmas shopping season.   They also have a map to show you where the other stores are and how much it is at other stores and you can purchase items through the app and have it ready for pick up when you arrive.  That's pretty handy.  But wait. . . there more!  Have a child with allergens, scan a UPC code and see the known allergens.  Pretty darn cool right? This app is also FREE and available for Iphone, android and Windows too.   Link to REDLASER app


You can also generate your own QR code that people can scan and get your phone number, email, or web address just by scanning!  


Hope these apps can help you save some major cash, maybe enough to buy yourself a Christmas present or two while you are out shopping anyway!


The opinions expressed in this post are my own and I have not been compensated in any way.


Tuesday, October 9, 2012

Halloween Mantel


I think Christmas decorating is going to be a nightmare.  And I know I will not be able to put any presents under the tree - for sure!  Good thing she's cute!


Thanks for stopping by!  Remember to follow along or like me on FACEBOOK  That's be awesome!! :)

Debbiedoo's

Halloween Mantels

Friday, October 5, 2012

Halloween Trifle


In yesterday's post, I mentioned that I was able to make 2 displays out of the one I had planned to make initially   One of the things that I love about decorating is using items I have in different ways.  You can make a cloche out of many things, without actually having to purchase the traditional glass.  A cake stand (with or even w/o) a cover, any large glass vase, a wire basket flipped upside down, a trifle bowl, a trifle bowl flipped upside down, or a canning jar are just a few examples.  I came across my trifle bowl and thought that filling it with Halloween objects might be fun.  And so the idea and the hunt began.  


My items ended up being some Halloween glass beads, a layer of small pumpkins, layer of spiders and a layer of green yarn.  I topped it off with my Fox Hollow inspired Dollar Tree Christmas House painted black, and a big crow on top.  A velvet ribbon and black and white embellishment finished off the look.


I've always love the look of trifles.  All those layers of yummieness.


And this one won't even need refrigeration.
Plus No calories!!

Thanks again for stopping by.
My Halloween mantel is my next project. 

Follow me on Facebook or here on the blog (or both!)

Partying at the following blogs:

My Uncommon Slice Of Suburbia

Funky Junk's Saturday Nite Special

DIY Show Off Fall Festival Party