Tuesday, February 4, 2014

Valentine Mantel


I am sharing my Valentine mantel today.  I am so happy that February has arrived.  It’s a short month and since we are already 4 days in, I’m feeling like we.can.do.this.  The next decorations going up will be Spring inspired!! So come on in, and take a look at what I’m looking at on my mantel right now. . .

valentines Mantel 2014 6
Inspiration began with some small pieces of pallet wood left over from our Insulated Fireplace Cover (you  can get the details by clicking on the colored words).  I Wanted to create something with wood and wire, and this seemed to be the answer.
Pallet Art

I just glued the boards together and then formed the words with some gold wire.  The heart is lined with a gold mesh on clearance from Christmas.  A few dabs of E6000 hold the letters in place.  I didn’t even bother to do anything with the wood, so it’s quite natural and raw looking.

Reusing the sticks from my Winter/Christmas mantel, I attached some cute hearts from DCWV which I found on clearance at Target.  They are actually supposed to go on the wall. I wrapped a glass vase in the same gold mesh I used on the pallet sign and added some letters, and a burlap wrap.  The  2 14 numbers are from last year. 
Valentine mantel 2014
Valentines Mantel 2014 2

Valentines Mantel 2014 3
A burlap bow, some greens, and a strand of glittery hearts dress up the mirror.  Good thing my kitchen was actually clean when I took these!

valentines mantel 2014 5
Hope your Valentine’s Day is filled with love!

Party Links:

Friday, January 3, 2014

Coffee Filter Snowman


snowman
I’ve seen a lot of coffee filter wreaths in blog world, and always love them.  They are so full and fluffy.  I thought they looked hard and time consuming, but the more I saw them, the more I really wanted to try using coffee filters on a project.  My version uses 2 embroidery hoops in two different sizes.  I found mine at a thrift store for a couple of bucks each.  The first thing I did was opened the hoops and put a paper grocery bag (cut open) inside.  Then I trimmed the paper to fit the hoop with an exacto knife.  This gave me a good flat surface to work with.

embroidery hoop

Then using the coffee filters, I opened them up, one at a time, and pinched the filter in the middle of the circle and twisted.  This formed a flower sort of shape.  I then folded down the pinched end and glued that part to the paper with Alenees glue.  Aleene’s is strong enough to hold them in place, so you can continue to add the flowers one at a time.  You continue this process until the form is completely filled.  After it dried I went back and added any additional fill needed, and fluffed up the filters.  Use scissors to even up any high spots.  At this point I used a bit of wire to connect the two hoops. 
The next step was adding some buttons for eyes, nose, mouth and buttons on the body.
snowman3
An old scarf and some sticks from the yard added the finishing touches.   I was surprised how easily it came together.  It really didn’t take that long to fill in the forms.   I didn’t add a hat because I was afraid of the weight on the filters, although I think I am going to add a felt hat.  I don’t think that will weigh it down, but I need to figure out how to make it stand up from the back.  Some trial and error and I’m sure I can figure it out. 

I think he’s pretty cute, and is a decoration I can leave up all winter.  This is a pretty big piece of wall art, since he is about 2  feet high.  He makes a nice statement.  With a foot of snow in the forecast for this weekend, I can probably build a real snowman soon!   

snowman2
Thank you for stopping by.

Linked to these great parties:

Sunday, December 29, 2013

How to Research Antique Furniture Styles–all at one site!


 Using Antiques to create a Statement piece in your Room.


DSCN3164


Have you decorated a room only to find there seems to be something missing?  A corner that just seems too plain, or maybe you’ve decorated in neutrals, and a little punch is needed from keeping the room from being too boring?  What you probably need is a statement piece.  Statement pieces are just what they sound like, a piece of furniture that makes a statement!  I think the best statement pieces are personal in nature.  A piece that says, “this is me!”  Chairs make great statement pieces as they are a piece of furniture that you can purchase, sometimes quite cheaply, to declare something unique about you.  After all, don’t you think your house should be a reflection of you and not a canned room put together by someone at the furniture store?  I’m thrilled that decorating has finally stopped being about being matchy, matchy.  I’ve never been a fan of this type of style.  It always looked too boring and lacking in character.  Finding pieces that speak to you and better yet speak about you always end up creating a more relaxing space for you to live in. 


Statement pieces can be new or old.  A great place to find a new statement piece, is Homegoods.  They always have a variety of unique, one of a kind pieces, and are usually reasonably priced too.  But some of the best statement pieces are antiques.  They have a story of their own to tell.  Many times your piece may be a hand-me-down or an inherited piece.  You have the story of where it came from and who owned it.  But maybe you’ve acquired a piece from an antique store, the side of the road, or a thrift shop.  You might not know the history, the style, or about the era it came from.  Perhaps, you’ve heard of or shopped at One Kings Lane.  They are also a wonderful source of quality unique pieces and vintage finds (did you know they have vintage items?).  They are now launching a new research site to help you identify pieces by period and  style, from the 1600’s all the way to the present!  They discuss styles, influences and how and why materials were used at certain times.  It’s really a wealth of information for anyone researching  furniture from med-evil to mid-century modern and everything in between! 


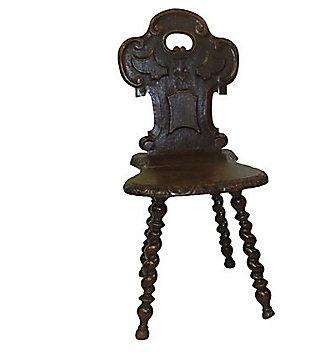
I’ve been invited to a sneak peek of the research site and I’ve been using it to research a statement chair I found in a thrift store last Winter.  I’ve determined though this site and the help of some kind friends on Hometalk that it is a Hall Chair.  Hall chairs were created for servants and tradesmen—simple construction with incredibly varied shapes. Below is a clip from the One Kings Lane site which I found, what I think, is a very close match to my chair.  Here is what my chair looked like when I found it: 

DSCN3164


And here is the article describing Hall chairs.

Elements of Georgian Style Chairs

An English hall chair typical of the Georgian period.

An English hall chair typical of the Georgian period.

Aside from the major style movements, other changes in England to impact chair design included:

The switch to using smaller sections of timber—leading to lighter construction.

Comfort improved with the innovation of the drop-in seat, which replaced loose cushions and caned seats.

With a 1721 Act of Parliament lifting heavy import duties, mahogany was much more widely available, mostly sourced from Jamaica.

The blueprint of the home shifted, as well, replacing the Elizabethan gallery with a library, leading to upholstered library armchairs, and new reading and writing chairs.


So, what do you think?  Is it a pretty good match?  I am happy to finally know what the chair is and what period it came from.  A special thanks to all the folks on Hometalk that submitted their suggestions on what they believed it to be.  You definitely help guide my search, and through the process of emilination, I was able to find my answer.  Did you know that Hometalk has a “Ask a question” section, where you can submit your questions about anything home related and the good people of the world will give you their advise and/or opinion?  It’s really quite helpful. 


If you have a piece of furniture you’d like to research on the One Kings Lane click on the picture below and you will be taken to the Research site.  It was so interesting to read about the influences and how and why styles were created.  Even if you don’t have something to look up, just reading about the styles can be a great learning experience, and maybe you just might learn a thing or two about something you own!!!


Click on the image below for SPECIAL access to the New research site!


one king Collage

Thanks for stopping by and visiting today!  Wishing you a very Happy New Year!!

Monday, December 2, 2013

Christmas Mantel 2013


I’m pleased to share my Christmas mantel with you today.  This mantel is so different than anything else I’ve ever done.  Never in a million years would I have dreamed that I would have a woody cabin inspired mantel.  It’s never been my style, but I suppose I should have kept in mind my favorite saying, “Never say Never”.  I’ve said it for years, because I truly believe you never stop changing and evolving.  What you dislike like today, you may like tomorrow and vise versa.  And really it’s not a bad thing.  Life changes and we need to too. Really the best part of this mantel in my mind, is the fact that I really had no idea where this mantel was going.  Months ago I decided I wanted to incorporated white branches in my Christmas mantel.  That was all I had going in.  I just started decorating, and looking around the house.  I pulled the mirror from the basement, the silver K was dusty and dirty in the garage, and the grapevine reindeer is from Joann’s.  He was actually in my car to return.  I loved him when I saw him, but just didn’t know how he would ever fit in to my décor.  Old white cable knit sweater sleeves dressed up some plain glass vases and gave my branches some where to sit.  I found this beautiful wool felted ribbon at a specialty store a while back.  
mantel4
I painted an old sconce glass by dipping it in paint and letting it dry.  It reminds me of a snowy mountain top.    
mantel7
A few extra large pinecones flank the edge of the mantel, set off by burlap bows.

mantel5
Saving that box of old clear bulbs that use too much electricity finally paid off!  I used some white paint and painted them to match, then using twine attached everything together.  It makes a nice subtle bunting.
mantel10
My snow shoes came from the Katie Brown collect at Meijer.  If you’ve never checked this line out, you totally should.  It is so cute I almost regret giving you this tip!
mantel8
I found this neat paper star at Home Goods and used it with some white picks to tie my tree into the mantel.  This is the first year I have two trees up in my house.  I purchased this skinny tree in an urn and really do love the size of it in my family room, which isn’t that large.  Not having a tree skirt on the floor makes everything feel neater.  I also added the painted lights attached to the wool ribbon around the tree as the garland.
mantel9
Here’s how it all looks together.  I am loving the layered effects of the wreath over the mirror and the reindeer on top of that.  It really adds a lot of dimension to the room.  The mantel feels cozy and natural to me.  I feel like I will be able to leave this up the whole winter. 
mantel2

My monogrammed  fire place cover is made from Pallet wood and is insulated to keep out the chill.  If you missed that post you can find it HERE.  Here’s a closer look at just the mantel. 

matel11

Thanks for stopping by!  I hope you enjoyed my mantel.   Diane


Sharing at:

Flusterbuster

Saturday, November 30, 2013

Chevron and pinecone Holiday Wreath


 5 minute wreath
While decorating for the holidays, I wanted to give my stainless steel reindeer a little holiday cheer.  So I took a grapevine wreath (available at the Dollar Tree), and simply wrapped the wreath in a chevron burlap (from Hobby Lobby).  I secured it in back with a dab of hot glue.  Then I took two sprigs of pine branches (Hobby Lobby again) and pulled apart the stems into smaller pieces and glued them around the bottom half of the wreath.  Afterward I tried a simple bow with the ribbon and attached it. I think it took longer for my glue gun to get hot than to complete the whole project.  The results were just what I wanted, simple and understated, but with enough flare to make my reindeer feel special.  And he does!  The end.

reindeer wreath

reindeer wreath 3

reindeer wreath 2
                     Thanks for stopping by!  Diane


Sharing at:

Saturday, November 23, 2013

Glass bowl Snowmen


I spent Tuesday afternoon crafting with my two good friends.  So much of my crafting is done alone, so when I get the chance to craft with friends, it’s always a good time.  This post is simple, short and sweet because we talked too much to get any pictures along the way.  So here are our 3 finished snowmen.
 
3 snowmen


My friend, Linn gets the credit for coming up with this craft and getting all the supplies.  Almost all of these items came from the Dollar Tree.  You will need 2 glass bowls (one fluted on top, and the other a smaller one that fits perfectly in inside the top of the first), one pair of socks (use one for the hat and one for the scarf), a string of white lights and embellishments of your choosing, white paint, modge podge and Epsom Salts.  

We painted the glass white and let it dry, then we use modge podge to coat the glass and added Epsom salts.  We applied a blow dryer once dry to whiten the Epsom salts and then used a clear coat spray over the top to help adhere the salts.  Stuff the lights evenly inside with the cord out the back, we applied a couple dots of hot glue to hold the glass jars together. Then with a hot glue we applied our embellishments.  Cut the sock one sock down the side to create one long piece.  This will be your scarf.  The other sock is your hat.  Again, use your imagination to create the hat you want.  I tied a knot on the top and cut off the open end to shorten.  Then I rolled it up to create a cuff. Or you could tie a string around the top to make the hat more flappy.  

Each one really has it’s own personality. Mine is the blue one on the right.  They are seriously stinkin’ cute in person!!

Sharing at:
DIY-party-show

All-things-dollar-tree-christmas-party

Wednesday, November 13, 2013

how I created an insulated fireplace cover with pallet wood!


Have you got a drafty fireplace????
fireplace 4
I do!  The calendar may only say November, but it has been cold around here lately,  and not just cold, but windy too. And that means that I am once again reminded of how the cold air can make the unlit fireplace feel down right cold.  Not to mention the loss of heat going right up the chimney.  I’m thinking of having a new sealing damper put on, but until I do, I needed something to help keep the family room a little more comfortable.  So I came up with an idea to help me stay warmer, it involves pallet wood.  No silly!  I’m not burning it (I don’t think that’s a good idea!) 

You start with a piece of Styrofoam installation.  I bought mine at Lowes.
fireplace 5 
Then you measure the inside edge of the insert and cut your foam to fit snuggly inside.  You want it to seal the opening completely.
fireplace 6
Next cut slits in so your door handles fit inside. This will allow you to push the foam completely flush, so it’s important! 
DSCN4675
Then I cut pallet wood to fit over the top of the Styrofoam and glued the wood to the foam with liquid nails.  I let  it dry over night.  I choose a flooring pattern. 

fireplace3
Using a wooden letter from Michael’s, I  laid it in the center and used Krylon Spray Wood Stain in Earthen Brown to paint over the whole piece. 

fireplace2
Then I removed the letter and voila, I had a cute monogramed fireplace cover.  Once it was dry, I put the panel in the opening of the fireplace. 

fireplace
Now I have an insulated fireplace panel that keeps out the cold drafts and looks cute to boot!!
fireplace 7
To start a fire we just have to pull it off and set it aside.  Remember NOT to place the cover on until your fireplace is completely cool again.  The Styrofoam is not fire-proof and neither is the pallet wood!!!  Always be safe. Remember to open your flue when starting a fire, and close it again when your fire is completely cooled. 
Hoping you stay warm and safe this winter!

Friday, November 1, 2013

Cold and Flu Tray


cold and flu season

As the leaves start to fall along with the temperatures, we all have cold and flu season to look forward to.  My family and I have already gotten our flu shots, but with 2 kids in school it’s inevitable that someone is going to have a cold or flu through-out the winter.  I thought it would be fun to create a cute little Cold and Flu tray to set aside just for those days when someone is feeling miserable.

sore throatcough drops

Using a couple of bar jars, I stenciled onto a burlap ribbon to create 2 jars, one for cough drops, and one for throat lozenges.  I then glued the ribbon to the jars and fastened some rick-rack around it.  Washi tape around the lid, and a matching scrap book paper inserted in the top of the jar finished them off.
cold tray
Then I used a cute barn tray my husband made, along with a vintage handkerchief from my mom and filled it with some cold essentials like; kleenex, saline spray, lotion, and a thermometer. Now when someone gets sick I can just pull out the tray and leave it on the bedside.

cold tray 2
Don’t you think this would help you feel just a little better?
I hope I never need this, but chances are, I will!

Linking up at:

Monday, October 28, 2013

10 Two-Ingredient Dessert Ideas to get you through the Holiday Season


10 cakes
It’s time to jump on the holiday wagon, ready or not!  Soon we will all be up to our necks in holiday get-togethers, parties, and company stopping by.  Often we will bring a dish to share, and sometimes getting to the store to get the ingredients is the hardest part of getting something together.  I’ve come up with a list of delicious 2 ingredient cakes (Ok one might have 3) that can be mixed together and ready in no time.  If you’ve never made a 2 ingredient cake, you are missing out!  I personally have been making the pumpkin and spice cake one for years.  But the best part about these cakes, is you can mix up the ingredients to match what you have on hand.  For example, although I love to make the pumpkin cake with spice cake mix, you could also use yellow or white or even carrot cake mix in place of the spice.  All of them give the cake a different flavor, but all are good. 

Last week my Mom’s group held our annual cooking demonstration.  I decided to give the pineapple and angel food cake a whirl.   I’d never had it before but love pineapples and angel food cake, so I figured it would be good.  I wasn’t disappointed!  I could have eaten that whole cake!  Good thing I had 30 friends to share with!  I do have to admit I added whipped white frosting (from a can) and then added toasted coconut to the top.  I suppose this technically makes it a 4 ingredient cake, but for the extra three minutes it took, I don’t think you will regret it!  I wasn’t able to get a picture of the cake cut, but here it is at home before I left.

        IMG_2353

Below are 10 ideas for other 2 ingredient cakes.  You can click on the picture to be taken to the recipes.  Some of the pictures take you to Pinterest, just look below the picture for the recipe.  Stocking up on a few of your favorite flavors will give you a quick, easy and delicious dessert to share with your family and friends.  And if you don’t tell them, they’ll never know how easy it was.  Of course, if you do tell them they will all think you are incredibly smart and wonderful for thinking of such a neat treat.  Either way, it’s win-win for you!  So go ahead and bake someone happy ~enjoy!

pineapple
Pineapple Angel  Food
recipe by justapinch

blueberry
Blueberry and angel food
recipe by  The Frugal Girls

creamsicle
Creamsicle
recipe by Better Recipes

lemon
Lemon cake
recipe by Budget 101

strawberry
Strawberry Cake
pumpkin
Pumpkin Spice Cake
recipe by Mommy Savers

chocolate
Almost Fat-free Chocolate
recipe by Food 2 Please

apple
Cinnamon Apple cake

banana cream
Banana Cream cake

key lime
Key Lime cake

peach
Peach Angel Food
recipe by Lizzie Jane Baby

Don’t they all look yummy?  Hope this gives you some inspiration and gives you a quick and easy dish to bring without the stress.