
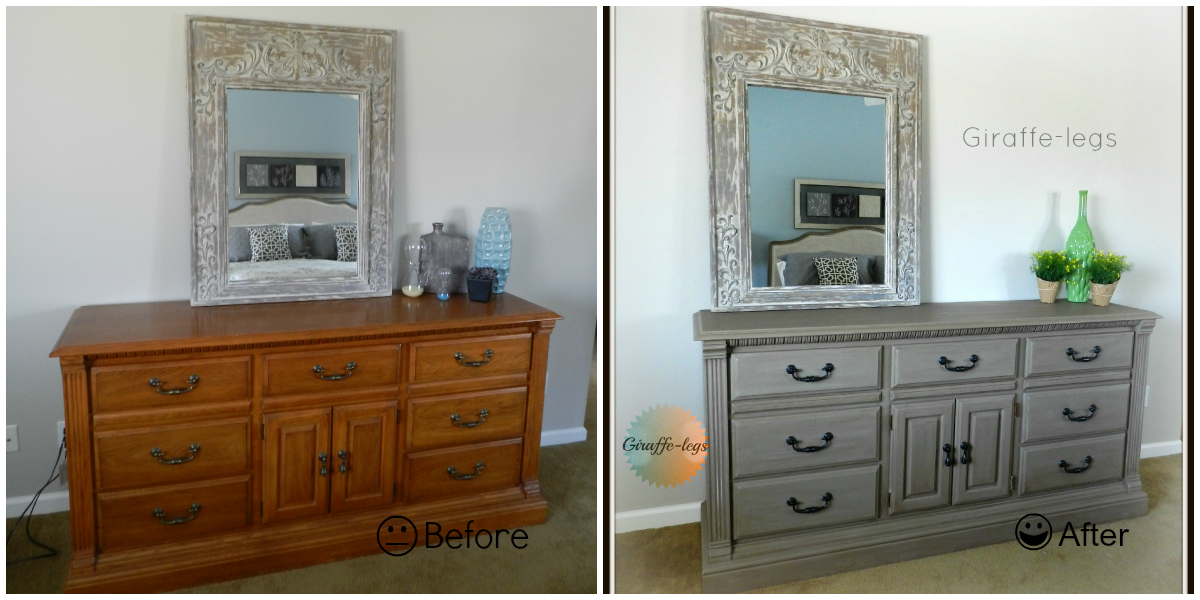
I am still working on redecorating my master bedroom. Gosh, it feels like forever, but the good thing about it, is that it's upstairs and tucked away, so people never really see the mess. My latest painting job may very well be my most difficult to date. Looking back at the pictures I realize I've been working on this for almost two months, but seriously I am in love and don't care how long it took. I wanted to try and re-create the wood on my new Restoration Bed. If you look carefully in the mirror you can see a glimpse of it. They have such a beautiful finish, and while I splurged on the bed, spending $3,000 or so on a dresser just wasn't happening. Especially when we had a really great quality dresser, with a not so great finish straight out of 1992.
The next step I added the dark wax directly to the paint. This was the part when I thought oh s#*@! What have I done? But of course it was just that first stroke that freaked me out. It really does change the color of the paint dramatically.


Here is a picture of the color difference with and without the wax.

And here is the entire dresser with dark wax. Again, quite lovely, but not where I wanted to be.

I then painted Annie Sloan old white on the dresser with a dry paint brush, allowing it to dry (which on top of the wax was still workable) and buffing in streaks of dark wax. This process is what took forever. Once I was happy with the finish I allowed it to sit for several days, and then applied a coat of clear wax over the top and buffed it with a soft cloth. The end result was a multi-layer effect with lots of character.
I will let the pictures below speak for themselves.
I will let the pictures below speak for themselves.


I spray painted the hardware in Oil Rubbed Bronze.


If you like what you see, then follow me!
or subscribe on the side bar ☞
Where I'm partying at:
Funky Junk Interiors
Debbie-Debbie doo's
I heart Naptime
DIY Show off
Thrifty Decorchick
Today's Creative Blog
Crazy Beautiful Life
Tipjunkie
Homestories A to Z
Savvy SouthernStyle
Debbie-Debbie doo's
I heart Naptime
DIY Show off
Thrifty Decorchick
Today's Creative Blog
Crazy Beautiful Life
Tipjunkie
Homestories A to Z
Savvy SouthernStyle
what a big difference! it looks great!
ReplyDeleteHi, I love your dresser. Great job. I followed you over from the POP party and am pinning your project. Thanks for the info.
ReplyDeleteI love that dresser. Great color choice.
ReplyDeleteWow! Excellent job, it's beautiful!
ReplyDeleteJenna @ rainonatinroof.com
Ohhh how pretty! I love the refreshed redo. Thanks for sharing:)
ReplyDeleteIt looks amazing! The depth in the color is really beautiful. I have a dresser re-do just waiting for me... I think I may be doing some layering! Thanks for the inspiration!
ReplyDeleteThat dresser looks identical to mine and I've been wanting to do my whole bedroom set. And, I'm with you...I would have said oh (&^% what have I done as well. That's what I'm afraid of. Probably why I keep talking about it and haven't done it. Your's looks amazing, now you got me thinking again.
ReplyDeleteI'm having a GOOGLE + Social hop. I'd love for you to hop on over, grab a button and link up your Google +. If you don't have Google + it's ok, come link up your blog or favorite post.
http://mydailyphotojourney.blogspot.com/2013/01/google-social-hop.html
I'm also looking for Pinterest Pinners to feature every week beginning in January. If you are on Pinterest and are interested in being featured come link up! Who knows you might meet some other great pinners and gain a few great ideas.
http://mydailyphotojourney.blogspot.com/2012/12/looking-for-pinners.html
I love that dresser! I wish I could find one for really cheap and make it over in a similar color you used. That color is totally my style. I'm a new follower and am excited to see more cute projects.
ReplyDeleteFeel free to stop by and follow back.
www.iheartpears.blogspot.com
How pretty is this! I need to find one like this to re-do for my guest bedroom that I will be doing sometime this year. I love how yours turned out! I just started a new blog hop and would love for you to come over and link up your post or any social media. http://designeddecor.com/talkin-about-thursday-2/
ReplyDeletewould you recommend that I follow the exact steps you did? starting with the coco color and so forth? I am in need of a re-do of our bedroom furniture and this looks amazing. I have not one creative bone in my body so i'm a little nervous and would need some details. I can't even find where to buy the Annie's Paints that's close to me. Any ideas?
ReplyDeleteThanks
The layering of the colors was the biggest trick. Practice on a piece of wood to achieve a look you like. I used AS paints, but you don't have to. Restoration Hardware has some beautiful colors, and there is also CeCe Caldwell, or Maison Blanche paints. Go to the websites and search for dealers or retailers. Otherwise go to your hardware store and choice colors, using a flat paint (it will lokk smoother and not show brush marks and imperfections . Now that it's been a while since I did this, I actually wish I had applied a poly-urethane instead of wax. It makes a piece of furniture easier to clean and wears better. Let me know if you decide to go for it. Good luck!
DeleteOkay, I am a restoration neophyte and am currently stuck on a project, hoping to seek your wisdom and advice! I became very inspired after looking at your project so I figured I could tackle our dining room set. I sanded the chairs, painted with Behr Willow Herb paint and primer, then Behr Bison Brown. I sanded it down to ensure that antique look as the willow herb color pulled through the sanded brown paint. Looks Amazing!!! Now, I figured i'd have to put a layer of clear coat over it to protect the paint job (and make sure none of it rubs off on our dinner guests..lol). We tried a polyurethane clear coat but found that it TOTALLY changed to look of my previously awesome matte antique chair. It changed the color of the paint to look darker and also made it look shiny. I did a ton of research on the topic and it seems that it's very difficult to keep that matte antique look with a water or oil based clear coat. Sherwin Williams said that there is no such product out there that will protect the chairs but also keep that matte finish look. Any advice???? please help.
ReplyDeleteSorry for the delay in my answer to you. I just saw this comment tonight. I'm hoping I'm not too late! First of all, it sounds amazing what you've done so far. I think I am going to agree with Sherwin Williams, sorta, a clear coat will provide a shine and change the finish, however the one thing that comes to mind is the CeCe Caldwell Satin finish. I know the matte finish is so pretty, but please keep in mind that if you do not seal it, grease and fingerprints will ruin the table to no repair with just the matte finish. Using wax alone will not make it durable enough. I found that out even on my dresser. I'm really wishing I had sealed it with a more durable finish. Here is a link to one of my favorite articles on this subject. http://altard.com/cece-caldwells/what-is-the-difference-between-cece-caldwells-annie-sloan/ I do have to tell you I haven't used the satin finish yet, but have talked with a person here locally who does all the time and loves it. I have switched to Cece Caldwell waxes, but I do still love the AS colors(plus at that price, I need to use up what I have). So that's all the advice I have right now. Wishing your project turns out well! Diane
DeleteGreat job on the repainting project! Do you still have that dresser, by the way? This only proves that renovations shouldn't have to be so expensive. Thanks for the tutorial! :)
ReplyDeleteLeeanne Dyson @ MasterMyList
Yes Leeanne I do! It's in my bedroom and I use it everyday.
DeleteIt looks fantastic! I refer to the step where you added the paint to the dark wax - in which quantities did you do this? This is definitely on my to do list, I'm just wondering - you said the AS clear wax doesn't make it so durable. I am from South Africa and have not heard of Cece Caldwell waxes or poly urethane before. What should I do.
ReplyDeleteWhy didn't you paint the hinges??
ReplyDeletepalm angels outlet
ReplyDeletehermes
fear of god essentials hoodie
giannis shoes
birkin bag
bape
fear of god hoodie
palm angels
jordan outlet
supreme clothing