Sunday, May 27, 2012

Staircase redo


We been very busy lately.  With the end of school nearing, birthdays, Mother Day, football, etc. so busy in fact that I hadn't had much time to sit down and blog.  Today I wanted to share one of my favorite projects we've done in awhile.  You have seen the basement remodel, and there was just one thing left to finish, the staircase.  We purposely left it unfinished as we schlepped things up and down the stairs.  Once everything was finished we had to wait until the weather got a little warmer so that I could stain in the garage.  Finally with everything stained and dried, we got to work.

The first thing to do was to remove the old dirty carpet and pull all the carpet staples.  Not a fun job, in fact, most of this project was NOT fun.  Painting a staircase, pulling staples, filling holes, sanding weird and hard to get to places, it kinda of all was not fun.  We had to research and figure tread rises, and extensions, and of course the staircase it self was not square.  To be honest this was a bit of a battle for a while with the hubby.  He was complaining that it was just too much work, and I was just about to throw in the towel and carpet the whole thing.  I am so happy that we didn't quit, and I can quite honestly say, my husband is in LOVE with his new steps. We love them so much in fact, that I would do the stairs to the upstairs in a minute!


dirty carpet
No color on the walls.


So here is what we started with:


Color was added to the walls.  Treads are down, but not stained.

Stair treads are stained and sealed in the garage.  

Wainscoting is added to the risers, after the treads are installed.   

My cute dog looks on as I snap a photo of our finished stairs.


The finished staircase.  We had the stain custom matched to our kitchen floor above.  The banister was
stained to match.  Our basement flooring is Koa which is a mix of lighter and darker tones.  The
dark stain on the stair compliments it well, and goes with the barn wood accents too.


Sometimes the harder the project, the more the satisfaction.  This was definitively was of those projects.  I am so happy with how they turned out.  Thanks for reading!    Di


Thursday, April 19, 2012

Finish what you started


Finish what you started

Hello all!  I know it's been a while since my last post, but I've been very busy over the last  month. I've taken a trip to San Francisco for a long weekend with my hubby, and also took my kids to Washington DC for Spring Break. Coast to coast in 2 weeks - wow!  I bet that will never happen again.  We've also lost our beloved dog, Haley, to old age.  Throw in a virus that had me down for about 10 days and I think you see where I've been, and why I haven't been very creative or productive over the last month.  

I've had some things hanging over my head from past projects and I've been working toward getting some things done this week.  A wise man (or woman, more likely) once said, "Finish what you start".   Isn't this what we always tell our kids?  We want them to have the satisfaction of seeing a job through from start to finish.  Finishing projects helps to build a sense of accomplishment, not to mention work on your problem solving skills.  It shows determination, especially when problems arise, and it really would be easier to walk away.  Maybe that's why so many marriages fail.  People can't see a project through.  They decide walking away is easier than working on the problem.  So maybe making your kids finish out that baseball season they hate, will save their marriage later in life.  

Recently, a friend of mine went to visit another friend that had recently "completed" a large amount of remolding and updating to her home.  I hadn't seen it yet, and when I asked the friend who did how it looked, she replied, "It's a mess.  There wasn't one thing finished!"  And I thought, how sad to have spent all that money, and when people see it, they don't even see the improvements, they can only see what looks like an unfinished project. 

Believe me I know, life can get in the way.  But I really try to make an effort to finish what I start.  Those finishing touches are the icing on the cake, the cherry on the top of the sundae.  They are the period at the end of a sentence.  Have you ever went house hunting and walked in to a house noticed all the little things that have never been finished?  The molding that never got put back up, the door that didn't get painted, it all starts to add up and before you know it you are starting to think, what else have they never done?  Do they change the furnace filter, do they perform the maintenance on items like they should, or this whole house going to explode a month after I move in?   You lose confidence in the owners, and start to question their abilities.  So that is why today I took the time to paint the closet doors and the entry door in my son's room.  It was the last thing I needed to do to complete the room, and believe me when I say that I would have rather done laundry rather than paint today.  Oh wait, I did laundry too!  Well you catch my drift.  I didn't want to do it, but I did, and now I am happy, except for the fact that completing that room painting means I now have no reason not to clean up the office.  Which is where all the junk and tools  were thrown when I started the project.  Another unfinished project, that along with the bathroom floor that needs to be washed, and the stairwell to the basement that needs to be painted and the stairs replaced.  Oh well. . . . I guess that can wait until tomorrow or the next day.  Here we go again!!

So after that philosophical post, I will share with you one of my Favorite pasta recipes.  It's called BLT Pasta. And it's what for dinner tonight!


Woman's Day 
Serves: 4  
Total Time: 25 min
 Prep Time: 25 min


 Ingredients 
 12 ounce(s) small rigatoni or other short pasta 
1/2 pound(s) sliced bacon (about 9 slices)
1 medium red onion, sliced 
1 pint(s) grape or cherry tomatoes, halved 
1 bunch(es) arugula, thick stems discarded, torn into pieces 


Directions


Cook the pasta according to package directions; drain and return it to the pot. Meanwhile, cook the bacon in a large skillet over medium heat until crisp, 6 to 8 minutes; transfer to a paper towel--lined plate. Break into pieces. Discard all but 2 Tbsp of the drippings and return the skillet to medium heat. Add the onion, season with 1/4 tsp each salt and pepper, and cook, stirring occasionally, until tender, 5 to 6 minutes. Add the tomatoes and arugula and cook, tossing, for 1 minute. Toss the onion-tomato mixture with the pasta and fold in the bacon. Serve hot or at room temperature. 


Tips & Techniques


 Prepare the recipe without the bacon (substitute 2 Tbsp oil for the drippings) and refrigerate for up to 2 days. Before serving, bring the pasta to room temperature. Cook the bacon, break into pieces and fold it into the pasta.


http://www.womansday.com/recipefinder/blt-pasta-recipe-122964

Friday, March 30, 2012

Thunderstorms and lemonade

This morning I found myself at Meijer while the rain poured down, the thunder clashed and the hail hit the roof so hard it was almost all you could hear in the store. Since I was without an umbrella, I found myself shopping a little slower, trying to wait out the storm.  While browsing around the produce section I came across strawberries in the marked down basket. They looked ripe, but not too mushy and it was a big ole pack for only 0.98 cents! That's a deal I couldn't pass up, after all it seems everytime I buy strawberries I have to throw out almost half because they are too cruddy anyway. I figured even if I threw out half of them, I would still be ahead. Once I got home I noticed that I also had a few lemons that needed to be used up, and so the idea of fresh strawberry lemonade was born!
I was shocked to see how nice the berries looked!


First I googled strawberry lemonade and came up with a recipe from Heather's Dish.

She suggested using the whole lemon rind included, which I had never heard of.  I did use a simple syrup recipe instead of adding the water and sugar separately.  This is basically bringing a cup of water and a cup of sugar to a boil on the stove top and then allowing to cool.  


After blending the lemons and syrup, I added 1 cup of strawberries and blended.
This is how it looked.


I would be happy to drink it with all the pulp, but I know my kids would not like it that way, so I strained the pulp and kept the juice.  Afterward I added water to fill the pitcher.  

I do have to say, I had to add more sugar.  I think the rinds add a more tart taste so it's not as sweet as when you just use the juice.  Next time I would just use the lemon juice and leave out the rinds.
  
Not to say it tastes bad, because it doesn't. 
It was very tasty and fresh.  I would just leave out the  rinds so I wouldn't have to add more than a cup of sugar. 

 It's a sugar control thing and not a taste thing. 
Get it? If your a mom, I think you do.  


So it's not only tasty but beautiful too.

I still had lots of strawberries left over after this, so I also made a strawberry juice concentrate and froze it for another day.  I'll post the recipe for that another time. 

:)

And so it was me and my lemonade on a rainy spring day, dreaming of summertime. . . . 

Tuesday, March 13, 2012

Peep pops


This is an easy one.  I actually made these last year for my daughter's 6th grade class.  I admit she was embarrassed by them at first.  But judging by the mob of children and teachers trying to get one, I am calling them a success.   
Here's all you need:
lollipop sticks (from Micheal's)
marshmallows
peeps
melting chocolate
decorative candy

Pop the marshmallow on the stick pushing it down far enough so you can stick the peep on top.
Push on the peep.
Lay flat and drizzle with chocolate and sprinkle on candy. Dry.
It seriously took me less than 15 minutes to make over 40.  No baking required.  
To hold them,  I poked a hole in a shoe box with a screw driver.  Make sure the screw driver is slightly smaller than the diameter of the stick or they will fall over.

Hope you enjoy this quick and simple idea!

Di

The 36th AVENUE

Monday, March 12, 2012

boys room reveal

Over the last few weeks I've been working on my son's room.  I am so happy to share the results with you today.  This was a tough room for me.  First of all, this was how the room looked when we moved in.  So although I had never decorated this room into a young boys theme, I was redecorating the room into a more grown-up space.  Not an easy task for a mama whose little boy is growing up.  It's hard to believe he will be 9 next month.  My second challenge came in decorating in a football theme.  I am not a big sports fan, so channeling my inner sports fan was not easy.  In the end I decided to go with a more classic theme and only add in football related accessories.  I explained that if in a few years he wanted to change the theme it would be easy enough to just change out the accessories.  He seems to have bought that - whew.


So here is the before shot.


And here is the after!
I love how much larger the room looks and feels.  Not to mention how much cleaner.  There is no better spring cleaning than a fresh coat of paint!

Enjoy your week!  

Di

Closet after - see closet organization here

Football sign made with scrapbook paper and pressed wood letters.


Home Stories A2Z

Thrifty Decor Chick

Thursday, March 8, 2012

Frog Tape VS Scotch Blue with Edge lock

I know you are probably sitting around and wondering, "What's better, Frog Tape or Scotch Blue?"  Well I think I may DO have the answer!  

OR
They both cost almost exactly the same.  Which is how I must of ended up with both in house at the same time.  I was adding some stripes to my son's room (even though I swore off adding stripes after the nursery incident, but I digress) and I only had enough Frog tape to make it once around the room, so I finished up with the blue tape.  I used the same method on both tapes, since I wanted this to be a true controlled experiment.  Once the tape was up and firmly sealed down I used the underneath wall color to paint once around the room.  I've read about this method and it is supposed to seal off the tape and eliminate the feathering and bleeding that is so frustrating.  


Then I painted.  As you can see it's Frog on the bottom and Blue on the top.

And
the 
winner 
is. . .


Frog! Clearly.  Look at those nice smooth lines along the bottom.  The top, not so much.


So next time you are painting, I recommend Frog Tape.  I know it's going to be my ONLY choice from now on!

Tuesday, March 6, 2012

Closet - Shambles to organized!

This WAS my son's closet.  I am not proud, but it was the reality.  He wanted his room painted, but
I could not do ANYTHING in there until I addressed this! Not completely his fault.  When we moved into this house 3 years ago none of the closets had any organization.
____________________________
I wish it was as easy as waving a magic wand, but it took way longer than I thought it would.  But it's the end result that matters, right?  So here it is now.


I took these plain wood boxes from Ikea, and stained them, added some rope as handles, and a chalk board label.


The stainless steel bins are from Lowes.

Look there is even some extra room!  I wish I could invite you over a month from now, and it would still look like this. . . . A mother can dream can't she?

Up next?  The newly decorated room.  Still in the process of finishing it, be patient it's coming!
Momma Hens Coop

Sunday, March 4, 2012

Wine Tasting party


Wine Tasting Party 2012


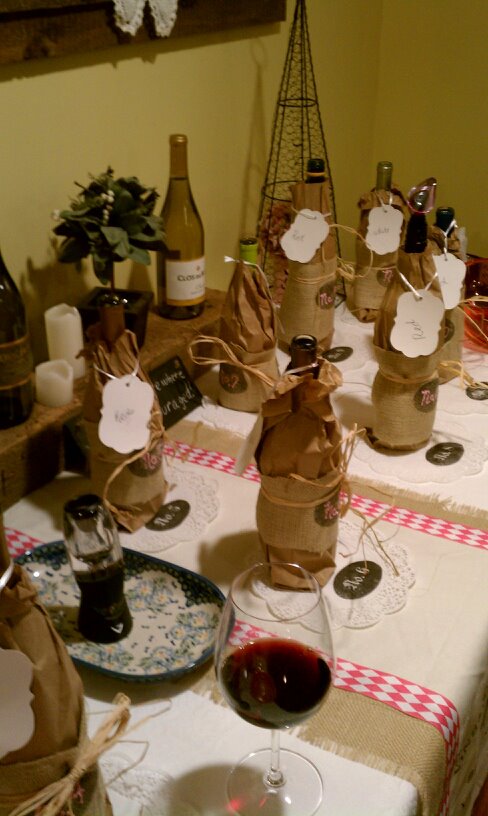
Last night I invited a small group of friends to my very first Wine tasting Party.  It was a great time!  I decided that this should be a blind tasting, so out of paper wine bags, burlap, and raffia I fashioned some cute wine bottle hiders.    The only thing guest knew was if it was red or white (designated by the tag around the neck of the bottle).


A wine tasting rating sheet was given to each guest (graphics compliments of Graphic Fairy) .  Rating were kept very simple with 5 loving it, to 1 a very diplomatic "I don't care for this wine".  This didn't stop my friends from creating their own 0 and negative ratings!


And then there was all the yummy foods!
Cheeses, fruits, nuts
cakes, chocolates, dips
It seemed the food just kept on coming!  Everything was so delicious!


Here are some girls at the tasting table.

The conversationalists.


It was a wonderful relaxing night.  I am so grateful to have such a nice bunch of friends.  

Here are a few of the decorations of the night.  

This is my grandparents wedding photo from 1924, printed onto transfer paper and transfered onto a canvas bag.  I then cut off the top handles, and plan on making it into a pillow sometime soon.  Right now it's home is on an extra frame with chicken wire.


I made this runner with a graphic from the Graphic Fairy, doesn't she have the best printables!?
Doilies with printed numbers helped to keep the wine bottles in the right place. 


  Hope you enjoyed reading about my wine tasting party as much as I enjoyed sharing it!  

CHEERS!!


The Graphics Fairy